
JUCE is an application framework in C++ for applications, apps and plugins; and can be used with many operating systems including macOS, Windows, Linux, iOS and Android. It is oriented around programming for audio, and has a large number of classes for audio, MIDI and video management as well as decent GUI and graphics support. The advantage of programming in JUCE is that you can support multiple OSs easily, and a large change in any of the OSs (such as the move of macOS to ARM) will usually not affect your programming.
Documentation
This webpage will only scratch the surface of JUCE plugin programming. To go further, you will need to do some research. Here are some resources you will use:
- The JUCE Class Index – up to date documentation of every class in JUCE. Looking over this list is a good way to get familiar with everything in the framework
- JUCE Tutorials – tutorials to help you get started on most uses of JUCE. These are simple and straightforward, so very good for beginning programmers.
- The JUCE examples folder – This folder is contained in the JUCE distribution. It contains examples of many of the classes in JUCE. The project DemoRunner will build an application from this example code so that you can see the classes running in an application.
- JUCE Forum – This is a good place to find answers when you get stuck. Usually there is someone else who asked your question already, so make sure to search before asking.
- Getting Started with JUCE – This book is a good introduction to JUCE, but it is focussed on the basics of building an application, and it barely touches on audio or plugins.
A simple plugin
This example will be an autopan, an audio processor that uses a slow oscillator to cyclically pan from left to right to left and so-on. To create this plugin, several elements are needed:
- a processing method – the method that performs the math to take an input sound and pan it, and the math that is needed to change the pan location automatically.
- state variables – the variables which keep the current state of the process, in this case the current pan position and the phase of the panning oscillator.
- parameter variables – the variables which represent the user controls on this plugin.
- an editor – the window and user interface elements (sliders, knobs, buttons and text input) needed to change the parameter’s values, as well as provide a visual indication of those same values and other parts of the audio process (vu meter, waveform display, etc.).
To start plugin development, first open the ProJucer. This will create a code skeleton that will be fleshed out later. Select “New Project…” and click on “Audio Plug-In“. In the window that appears, type the plugin name (“Autopan”) and select your OS under “Target Platforms“, click “Create” and the project window will open.
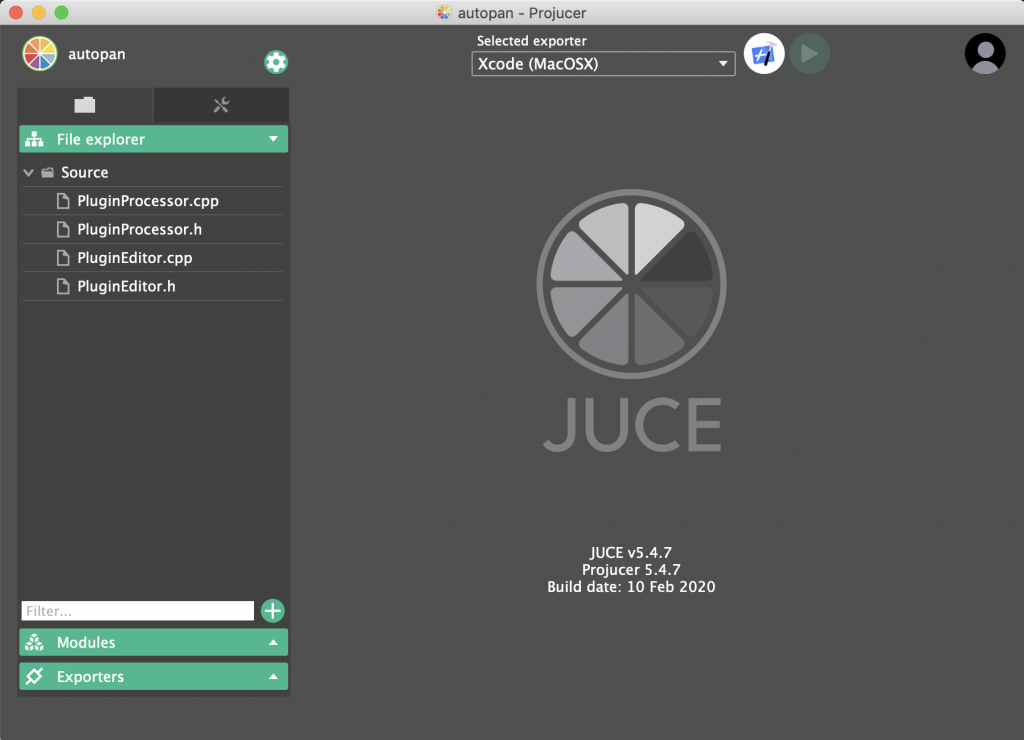
The C++ source files are in the left column under File Exporter, the other sections in the left column are Modules – C++ code from JUCE, and Exporters – the target OS and development system. There is also a small gear icon on the upper right top of the left column. This is where general plugin settings are entered. Scroll down to plugin formats and select AU (macOS only) and standalone. The Steinberg VST SDK is needed to develop VST and VST3 plugins, we will do this later in class.
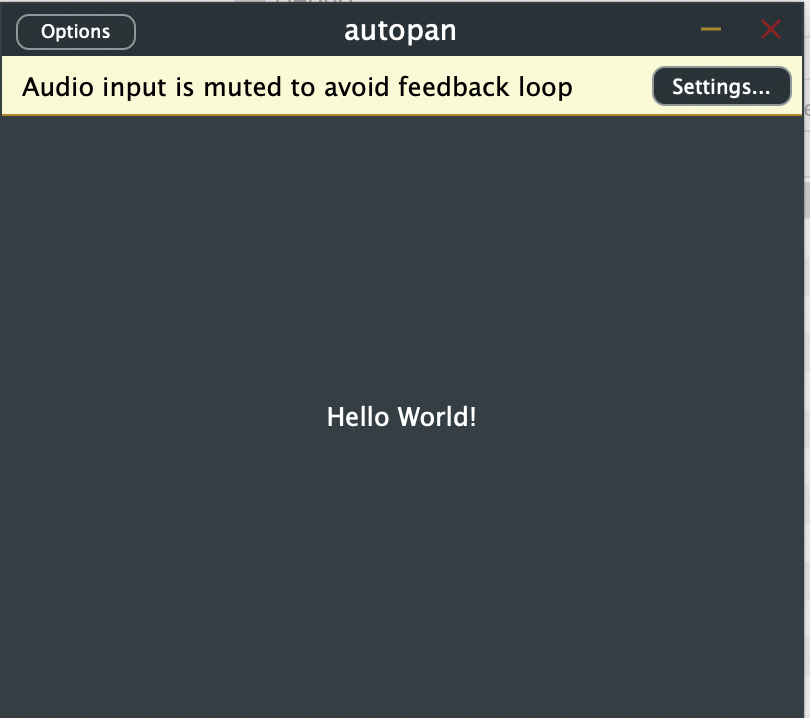
You can edit your software and compile it in the Projucer, but in class we will look at using Xcode or Visual Studio to edit and compile. To open one of these, click the button with the Xcode or Visual Studio icon on the upper right part of the Projucer window. The skeleton code will create a working plugin, one that simply passes audio without changing it. After you select “Build” in the compiler, the compiler will create a standalone application and an audio unit (on macOS). The finished files can be seen in the Products area in the compiler, and if all goes well, will look like this when you start it.
Editing the Processing Method
The method processBlock is in the file PluginProcessor. It receives two parameters, a pointer to an AudioBuffer and a pointer to a MidiBuffer which contain the samples and MIDI messages collected during the last audio block. We need to change the code at the bottom of this method. The default reads as follows:
    for (int channel = 0; channel < totalNumInputChannels; ++channel)
     {
         auto* channelData = buffer.getWritePointer (channel);


         // ..do something to the data...
     }
This for loop is organized to apply the same processing to each channel separately. For panning, we need separate processing for each channel, so we will remove the for loop. Instead we will derive separate pointers for left and right input and output samples arrays from the AudioBuffer. In addition, we will add a for loop for sample-by-sample processing.
     auto leftInSamples = buffer.getReadPointer(0);
     auto rightInSamples = buffer.getReadPointer(1);
     auto leftOutSamples = buffer.getWritePointer(0);
     auto rightOutSamples = buffer.getWritePointer(1);
     for(int sample = 0; sample < buffer.getNumSamples(); sample++)
     {
         // make it a mono input
         double monoIn = (*(leftInSamples+sample) + *(rightInSamples+sample)) * 0.5;

        // compute phase for 0.1Hz
         phase = phase + 0.1/getSampleRate();
         // if phase goes over 1.0, subtract 1.0
         if(phase >= 1.0)phase -= 1.0;

        // create a sine wave from the phase
         double sineMod = sin(2.0 * 3.141592653589793 * phase);
         // scale and offset so it goes from 0 to 1, rathen than -1 to 1
         sineMod = (sineMod + 1.0) * 0.5;
         // use the sine wave to modulate the volume of the
         // left and right output
         *(leftOutSamples+sample) = sineMod * monoIn;
         *(rightOutSamples+sample) = (1.0 - sineMod) * monoIn;
     }
 }
The variable phase has not been declared, so will cause an error if you try to compile this code. It is a state variable, that is, it is a value represents the changing state of the process and needs to be preserved after the processBlock method. To do this, we will declare it as a member of the AutopanAudioProcessor. Edit the file PluginProcessor.h and add the line
    double phase;
private:
above private: . Also, in the class constructor AutopanAudioProcessor::AutopanAudioProcessor() set the initial phase to 0.0.
#endif
 {
     phase = 0.0;
 }
Once this is compiled, you can test it in any Audio Unit host. You should clearly hear the music moving left to right and back again.
Parameters and GUI Controls
Internal parameters and GUI controls ideally should be implemented at the same time, as they are dependent on each other. Not only do the GUI controls set the internal parameter, but automation and the host app will also set it. In this case the GUI needs to respond to the change of parameter and display the same value. As this would mean moving a slider or other control to match the parameter, it is important that the slider doesn’t send a parameter change back to the internal process. To prevent this loop and to remain compatible with automation logic from various DAWs, a number of connected classes are used.
- Slider: the GUI control
- SliderAttachment: this connects the GUI to the parameter
- AudioProcessorValueTreeState: a container for organized parameters
We can start by adding a AudioProcessorValueTreeState to the AudioProcessor. Edit PluginProcessor.h and add it in the public: section of the class definition (we will later access this object from the AudioProcessorEditor).
    double phase;
    juce::AudioProcessorValueTreeState parameters;
private:
Now that we have the parameter container, we can add a parameter or more to parameters in the PluginProcessor constructor initializer list (look this up in your C++ book). First, parameter is initialized, then a bracketed list of parameters are created and added. Within the constructor, the pointers to data are copied to pointers in the AutopanAudioProcessor class so that they can be referred to later (and won’t go out of scope). Once we compile this, we should see and be able to set the parameters in Ableton Live.
AutopanAudioProcessor::AutopanAudioProcessor()
        : parameters (*this, nullptr, juce::Identifier ("APVTSAutopan"),
                      {
                          std::make_unique<juce::AudioParameterFloat> ("lfofreq",            // parameterID
                                                                       "Frequency",            // parameter name
                                                                       0.1f,              // minimum value
                                                                       10.0f,              // maximum value
                                                                       1.0f),             // default value
                          std::make_unique<juce::AudioParameterFloat> ("lfodepth",      // parameterID
                                                                      "Depth",     // parameter name
                                                                      0.0f,              // minimum value
                                                                       1.0f,              // maximum value
                                                                       0.5f),             // default value
                      })
    {
    // pointers are copied to items declared in object so they don't go out of scope
     depthParm = parameters.getRawParameterValue ("lfodepth");
     freqParm = parameters.getRawParameterValue ("lfofreq");

   }
// in the class definition
     juce::AudioProcessorValueTreeState parameters;
private:
     std::atomic<float>* depthParm = nullptr;
     std::atomic<float>* freqParm  = nullptr;
      //==============================================================================
// and finally, in processBlock
    auto rightOutSamples = buffer.getWritePointer(1);
     for(int sample = 0; sample < buffer.getNumSamples(); sample++)
     {
         // make it a mono input
         double monoIn = (*(leftInSamples+sample) + *(rightInSamples+sample)) * 0.5;


        // compute phase for 0.1Hz
         phase = phase + *freqParm/getSampleRate();
         // if phase goes over 1.0, subtract 1.0
         if(phase >= 1.0)phase -= 1.0;


        // create a sine wave from the phase
         double sineMod = sin(2.0 * 3.141592653589793 * phase) * *depthParm;
Adding Sliders to the AudioProcessorEditor class
First we need to declare both Slider and SliderAttachment objects in the AudioProcessorEditor class. The SliderAttachment connects the Slider control to the AudioProcessorValueTreeState and takes care of automation and all other parameter changes. We need one of each object for each parameter, and we can declare them in the private area of PluginEditor.h.
private:
    juce::Slider lfoDepthSlider;
    juce::Slider lfoFreqSlider;
    juce::AudioProcessorValueTreeState::SliderAttachment lfoDepthSA;
    juce::AudioProcessorValueTreeState::SliderAttachment lfoFreqSA;
We will now initialize the SliderAttachment objects in the AudioProcessorEditor constructor initializer list. Make sure to enter the parameterID that is used for each respective parameter.
AutopanAudioProcessorEditor::AutopanAudioProcessorEditor (AutopanAudioProcessor& p)
    : AudioProcessorEditor (&p), audioProcessor (p),
        lfoDepthSA(p.parameters, "lfodepth",  lfoDepthSlider),
        lfoFreqSA(p.parameters, "lfofreq",  lfoFreqSlider)
{
Finally, we can initialize the Slider objects in the AudioProcessorEditor constructor. There are many parameters that can be set to customize the look of the Slider. Note that the range and default values are copied from the AudioProcessorValueTreeState, so they do not need to be set. The method addAndMakeVisible will connect the Slider to the AudioProcessorEditor as a child component, and will make it visible.
AutopanAudioProcessorEditor::AutopanAudioProcessorEditor (AutopanAudioProcessor& p)
    : AudioProcessorEditor (&p),
        lfoDepthSA(p.parameters, "lfodepth",  lfoDepthSlider),
        lfoFreqSA(p.parameters, "lfofreq",  lfoFreqSlider),
        audioProcessor (p)
{
    lfoFreqSlider.setName("LFO Frequency");
    lfoFreqSlider.setBounds (10, 10, 300, 20);
    addAndMakeVisible(&lfoFreqSlider);

    lfoDepthSlider.setName("LFO Depth");
    lfoDepthSlider.setBounds (10, 40, 300, 20);
    addAndMakeVisible(&lfoDepthSlider);

    // Make sure that before the constructor has finished, you've set the
    // editor's size to whatever you need it to be.
    setSize (400, 300);
}
At this point you may want to customize the look of the plugin background by adding graphics programming to the paint method. This method receives a Graphics object, and it is worth spending some time learning the methods in this object.
Customization of the Slider and TextButton objects can be achieved by creating your own LookAndFeel class. The methods of the LookAndFeel class will override the paint methods of all of the GUI objects in juce.